Saturday, May 30, 2015

Fries Con Queso

Weekends are for kicking back, relaxing, and not having to put too much thought into anything. I know that with kids the kicking back and relaxing usually has to wait until bedtime but there are days that just require deep deck sitting and a very large, very cold adult beverage and a simple dinner while the kids just run around the backyard. By simple I don't mean boring.  And I'm going to make your day today.  No thought and definitely no rushing to the grocery for obscure ingredients.  I'm willing to bet that you're going to have everything on the list already in your fridge.

Fries Con Queso

Fries Con Queso

Ingredients:

1/2 cup Kraft Cheez Whiz
1/4 cup Salsa, your favourite kind
Frozen French Fries

Directions:

1. Make your fries as directed.

2. Microwave the cheez whiz for about 30 seconds on high.  Even if it's not completely melted a good stirring usually finishes it up.  Stir in the salsa until combined. Pour over fries & enjoy!


Like seriously, how easy is that!  It's just not good on fries, add it to hot dogs, burgers, nacho's, anything that requires an excellent cheese sauce.  Give it a try, you won't be disappointed!


Stay Sweet!
Tammy

Tuesday, May 26, 2015

Venison, Broccoli, & Spinach Stir Fry

Getting your hands on venison in these parts can be tricky.  Most people have a friend or a friend of a friend that hunts but getting them to give up a morsel of their prize can take some serious negotiations.  I'm talking about, you'll have to be willing to give up your first born or have to promise to re-roof their two storey house on the hottest day of the year and you have a fear of heights kind of negotiating.  It's not usually easy and it's definitely not something you can just pick up at the grocery store.  We lucked into a few cuts from a friend who received a bit too much for his own use (a bachelor) and considered it a sin to go to waste, I completely agree.

Working with wild game, especially meats like moose and deer can be difficult. Each has a level of 'game-iness' to them and you never really know how intense that taste is until it's cooked.  There is trick to cut that down and that's milk! The higher the fat level in the milk the better.  I don't know the science behind it (probably something with the natural enzymes) but I do know that it works wonders.


Venison, Broccoli, & Spinach Stir Fry


Venison, Broccoli, & Spinach Stir Fry

Ingredients:

1.5 lbs Venison
Milk
1.5 cups Broccoli
1 cup Spinach, chopped
1.5 cups All-purpose Flour
1 tsp Garlic Powder
1/2 tsp Ginger Powder
Salt & Pepper
1 pkg Blue Dragon Beef & Broccoli Stir Fry Sauce
Sesame Seeds, optional

Directions:

1. Defrost your venison and place in a deep dish.  Pour enough milk over to cover.  Remember, the higher the fat content the better.  I've used 2%. Wrap the dish is plastic wrap and refrigerate for a minimum of 4 hours or as long as over night.


2. Drain the milk and remove any of the tough connecting tissue from the cuts with a good, sharp fillet knife. Dice into smaller bite size pieces.


3. Combine the flour and seasonings in a small bowl.  Lightly coat each piece of the venison in the flour mixture.  Preheat a large frying pan and add a small amount of butter.  Add enough of the coated meat to cover the bottom of the pan without crowding.  I had to do two batches.  Fry until a nice crust forms on all sides about 2 minutes each side, keeping watch over any of the smaller, thinner pieces.  Remove each piece as it finishes cooking and set aside.  Repeat for any remaining pieces.


4. In the same pan add about 1/3 cup of water and the broccoli.  Once the broccoli is starting to turn bright green add the spinach.  Let the spinach wilt and the water evapourate.  Return the venison to the pan and add the package of stir fry sauce to heat.


5. Place in a serving dish and garnish with the sesame seeds.  Enjoy!

Venison, Broccoli, and Spinach Stir Fry


Stay Sweet!
Tammy

Monday, May 25, 2015

Saturday, May 23, 2015

Sausage Stuffed Peppers

I don't know how it happened but there's nothing scheduled around the Life & Food household this weekend.  No running around, no "I have to be <someplace> at <such time>".  It's late in the afternoon and I'm still in my PJ's without a care in the world.  I love these types of days <3 . I am considering heading outside to finish up prepping the garden but for me that's still a lazy task - just me, my tunes, and the weeds.  I am happy to report that after 4 years of waiting and watching a little plant grow, my lilac tree has finally bloomed and it's beautiful!


What are you doing today?  Over-scheduled & going crazy or kicking back & enjoying a beautiful Spring day? Do you know what works well on a either type of day?  An easy, delicious meal that takes almost no time at all to prepare.  I'm here to provide you the instructions for that kind of meal!  I'm so nice, aren't I?  Let's get this started!

Sausage Stuffed Peppers


Ingredients:

2 large Green Peppers
2 Mild Italian Sausages
1/2 small Onion
1/2 cup Marinara Sauce
1/2 tbsp Italian seasoning
1 cup Sharp Cheddar, grated
1 tbsp Grated Parmesan
Spaghetti Noodles
Parsley for garnish, optional

Directions:

1. Put a pot of water on to boil for the noodles & cook, as always, according to the package. I do break the noodles in half before adding to the water, it makes stuffing the peppers a little easier. Cut the peppers in half, de-seed, and wash, set aside to drip dry. I just set them upside down on a paper towel until I'm ready to use them.

2. Chop your onion and add to a small frying pan with a little butter/oil.  De-case the sausage into the pan and add the Italian Seasoning.  Fry until lightly browned.


3.  Once the sausage is browned and the noodles are done & drained combine both with the marinara sauce.


4. Divide the noodle mixture between each of the pepper halves.  Remember to push it into any of the curves and bends in the pepper.  Place in an oven safe dish and top with the cheddar and sprinkle on the parmesan.


5. Bake in a preheated 425*F oven for 20 - 30 minutes.  Keep an eye on the cheese,  you don't want it to burn but you do want the pepper to soften.  If the cheese is browning too quickly, cover with aluminium foil.  When done sprinkle with the parsley to add a little colour and serve.  Enjoy!


Stay Sweet!
Tammy

Thursday, May 21, 2015

Chocolate Pound Cake

I live with a bunch of chocoholics. If there's even an ounce of chocolate in something it won't last more than a day to two. So, just imagine the bug-eye's I got when they came home to find a chocolate pound cake, with chocolate ganache and fudge buttercream. Yeah, it was like Christmas!

Chocolate Pound Cake


Cake Ingredients:

1 cup Cake & Pastry Flour
1 tsp Salt
3/4 cup Cocoa Powder
2 oz Semi-Sweet Bakers Chocolate, chopped
1/3 cup Boiling Water
1 cup Butter, softened
1 1/4 cup Granulated Sugar
5 large Eggs
6 Chocolate Covered Coffee Beans, optional

Directions:

1. Preheat your oven to 325*F.  Grease and flour a 9 x 5 cake pan.

2. Sift together flour & salt in a separate bowl (not your mixing bowl) and set aside.

3. In another bowl add the chopped chocolate and pour the boiling water over it. Stir until the chocolate is melted, then add the cocoa powder.  Mix well.

4. In your mixing bowl combine the butter and sugar until light & fluffy.  Slowly pour in the chocolate and mix well. Add the eggs, one at a time, mixing well in between.

5. Slowly add the flour, remembering to periodically scrap down sides of the bowl. Once all the flour is mixed in pour the batter into the prepared pan.  Bake for 1 hour or until a toothpick inserted in the centre comes out clean.

6. Let cool in the pan for 10 minutes and then turn out onto a wire rack.  While the cake is cooling prepare the ganache.


Ganache Ingredients:

3 oz Semi-Sweet Chocolate
1/2 Heavy Whipping Cream

Directions:

1. Melt the chocolate in a double boiler.  Once melted whisk in the heavy cream until silky smooth.

2. Pour over the top of the cake and use a cake spatula to push it over the edges for a nice dripping effect.

3. Refrigerate for 20 minutes to set the ganache. Prepare the fudge buttercream.


Chocolate Fudge Buttercream

1 3/4 cups Icing Sugar
1/4 cup Cocoa Powder
1/4 cup Butter, softened
3/4 cup Light Brown Sugar, packed
1/2 cup Half & Half Cream
2 oz Semi-sweet Baker's Chocolate
1/2 tsp Vanilla
1/4 tsp Salt

Directions:

1. Sift together the icing sugar and cocoa powder and set aside.

2. In a small sauce pan heat, over medium-low, 2 tbsp of the butter, brown sugar, and 1/4 cup of the half & half, stirring occasionally, until small bubbles form around the edges. 

3. Reduce the heat to low and let simmer, continue stirring frequently until the mixture thickens slightly and turns a deep gold colour.  

4. Transfer to a mixing bowl and add the remaining butter and half & half, mixing well.  Slowly whisk in the icing sugar mixture.  Cool to room temperature, stirring occasionally.  Cool in the fridge until the desire consistency is reached.

5. Pipe a nice design around the cake and add the chocolate covered coffee beans.


Stay Sweet!
Tammy

Tuesday, May 19, 2015

The Ultimate Mashed Potatoes

The summer has officially started.  We have our first long weekend under our belts here and what a beautiful three days it was.  Not only did the weather completely cooperate, my family and I got to spend lots of BFF time with my bestie & her entire family. Fireworks, parades, and drinks on the patio until 1 am. It was perfect!

Now that it's Tuesday and life is back to normal with school and work; it got me thinking about the next long weekend. While we spend most of this past weekend in a neighbouring town, Canada Day will be spent at home with my extended family. BBQ's, lighting our own fireworks, and of course more drinks on the deck. Well, that's the plan as it sits now.  I always like to offer up a selection of goodies when it comes to the bbq portion of the festivities. And I think I've come up with a winner for this years spread - mashed potatoes in a bacon cup!  Give them a try and let me know what you think.

The Ultimate Mashed Potatoes


Ingredients:

16 slices Bacon
5 medium Potatoes
1/2 cup Sour Cream
3 tbsp Butter
1/4 cup Milk
3 cloves Garlic, pressed or minced as finely as possible
1 tbsp dried Parsley (plus more for garnish)
1 cup Sharp Cheddar, grated
Salt & Pepper

Directions:

1. Preheat your oven to 400*F. Soak 16 toothpicks in a small bowl of water while you get your bacon ready.  Cut 8 strips of raw bacon in half. Place 2 of the cut pieces in an X on the bottom of a muffin tin cup. Repeat for the next seven cups. Weave the uncut strips around the ends of the cut strips following around the sides of the muffin cup (1 strip per cup). Secure everything with 2 of toothpicks stick into the sides making an X to hold the cut pieces to the side piece. Bake for 30 minutes, ciphering out the grease every 10 minutes or so depending on how much is accumulating in the bottom of the cup, I just use a baster to suck it out.


2. While your bacon is baking.  Peel and cube the potatoes.  Boil in salted water until soft.  Drain and lightly mash.  Add the butter, sour cream, and milk and continue mashing until very smooth.  Stir in garlic, parsley, salt, and pepper until well combined.

3. Take the bacon out of the oven and remove the toothpicks and any of the remaining grease.  Fill a piping bag that has a large opening in the bottom with the mashed potatoes.  Fill each cup with the potatoes and top with the grated cheese.  Return to the oven for 5 - 10 minutes or until the cheese melts.  Carefully remove from the muffin tin, place on your serving dish and garnish with more parsley. Enjoy!


Stay Sweet!
Tammy


Friday, May 15, 2015

The Cake Craze

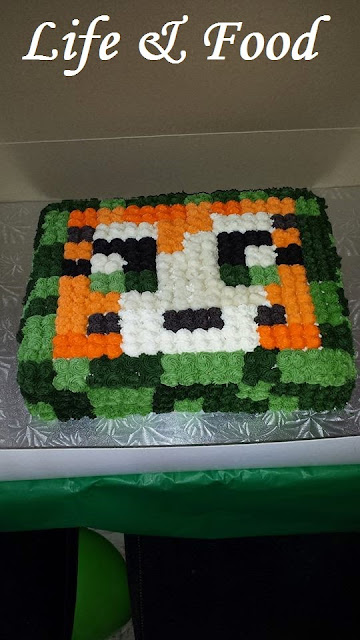
As promised the cakes that have kept this baking machine working over-time.

The first is a cake that I did for a friend's daughters 9th birthday.  Let me tell you, I had no idea what Minecraft was really until she asked me to create this.  I've heard of it, of course, from friends kids that played but I was completely oblivious as too the look of the characters or even the names.  Let's all hail Google for a moment on this one because it really saved my bacon! A quick search for something called Stampy Cat - Minecraft and boom! There it was in all it's pixalated glory.

Don't the let the seemingly simple design fool you.  This took some serious planning, and the execution & geometry had to be perfect. I learned this first hand because I had to wipe it clean when I was sooooo close to being done.  My grid was off and the bottom portion looked like the vertical hold was going. So what I planned to have done in 3 hrs took me over 6.  However, I think it turned out great! Well worth the sleepless night.


After a complete crash from working on Minecraft, my cousin messaged me.  She was having issues with getting her daughters Frozen cake ready.  I offered to come over and help her out - at midnight.  Girlie had decided to change up what she wanted on her cake.  The original was suppose to be a "Barbie" style dress cake with Anna or Elsa but it turned out she didn't want her doll stuck in a cake, she wanted Olaf. So in the wee hours of morning, and with limited supplies Cousin & I managed to get this done.  Not bad for 5 am and complete design change, I think.


Next came another cousin request.  A Monster High design on a half & half cake.  I probably could have done this one in fondant but let's be honest here - kids don't like fondant, especially 5 year olds.  When I do kids cakes I always try to use buttercream instead of fondant.  I love the rustic look of the white buttercream with the piping of the emblem. I think this is one of my favourite cakes.


And finally, my cutie-pie cupcakes.  These were ordered by a former co-worker, a real estate agent with a million dollar listing, and these babies were going to be offered at the open house.  Let me tell you, I stressed about them for days!  With being mini cupcakes decorating them is somewhat limited and it was made very clear to me that they had to be pretty.  All I could think of was, 'what does she constitute as pretty?'  I finally decided that I needed to keep things simple.  No over decorating or lots of fondant, just a nice dollop of buttercream and little accents of fondant ribbon rosebuds would be perfect.  So away I went.  I even luster dusted the pink roses to add a little shimmer. The agent loved them <3 .


You will see some of these cakes again because I have tutorials & recipes for them.  Keep checking back and see what's been cooking in my little kitchen.

Stay Sweet!
Tammy

Tuesday, May 12, 2015

Music Monday-Battle of the best

I know I'm a little late for this weeks Music Monday so lets call this one Tunes Tuesday. And I'll be on track for next weeks post, promise :D

To do something a little different - I want your opinion!  Tell me who do you think did this song better.  Rod Stewart or Sarah Evans - My Heart Can't Tell You No.


OR


Listen to them both and comment on your fav <3

Stay Sweet!
Tammy

Philly Cheese Steak Pizza

First of all let me apologize to the citizens of Philadelphia. I have never been your amazing city but I would like to.  I hope I don't offend the true cheese steak purists too much with my rendition of their iconic sandwich in a pizza form.  See, my exposure is limited to a Canadian take on it (and I've added a little cheater) and while what we serve up here in the Great White North is completely excellent, I have no clue how close it is to the real thing. I will, one day, find out!  Let's get started,shall we?

Philly Cheese Steak Pizza
 (my way)


Ingredients:

Pizza Crust (ready made or homemade)
1/4 cup Corn Meal, optional
1/2 medium Onion, sliced
1/2 medium Green Pepper, sliced
1 cup Mushrooms, sliced
1/4 cup Ranch Dressing
1/2 cup Mozzarella Cheese (grated) or Provalone (sliced), (I would have loved to use to use the Provalone but I only had Mozzarella on hand)
1/2 cup Garlic & Herb White Cheddar, grated
6 Slices of Roast Beef Sandwich meat, cut into short strips - this is my cheater :D


Directions:

1. Prepare the crust if needed. I've made mine from scratch but a store bought ready made will work just fine as well. If you do use a homemade crust I suggest using the corn meal as a base,especially if you use a pizza stone - this will make transferring the pizza to the stone much easier.


2. Preheat your pizza stone in a 400*F oven or as directed by your crust recipe.

3. Saute the onion, peppers, mushrooms in a little butter or oil until they just soft.


4. Add the ranch dressing to the crust as your sauce and spread for a nice even layer. I like very little crust on my pizza so I take the sauce almost right to the edge.  The less crust the more toppings!


5. While your veggies are sauteing grate your cheeses and slice up the roast beef if you haven't done so already.  Please ignore the cheddar in the picture - Daughter B prefer's just cheese pizza so I made her an individual 3 cheese pizza.


6. Now it's time to assemble.  Spread out the sauteed veggies in a nice even layer over the ranch dressing and fill any spots with the sliced roast beef.  Top everything with the cheeses.


7. Bake for 10 - 15 minutes on a pizza stone or 15 - 20 on a regular pizza pan.  You want the crust to brown & puff up and the cheese to melt into a bubbly mess. Enjoy!


Stay Sweet!
Tammy


Tuesday, May 5, 2015

Chicken Parmesan

I love when you can get a recipe that you've never tried before right the first time! <3  Because really, what's worse than spending all that time and expense on something that sucks?  Lucky for you my success can be your success too! An amazingly tasty chicken parm that will keep your family asking for more.

Chicken Parmesan  


Ingredients:

2 boneless skinless Chicken Breasts, thawed
1 1/2 cups All-purpose Flour
2 large Eggs
2 cups Bread Crumbs
1 tbsp Italian Seasoning
1 tsp Parsley
1 tsp Garlic Salt
Salt & Pepper
1 jar Pasta Sauce
1 cup Mozzarella 
2 tbsp Grated Parmesan
Spaghetti Noodles
Vegetable Oil

Directions:

1.  Place one chicken breast between two pieces of plastic wrap and pound flat using either a meat tenderizer or a wooden rolling pin. Stressful day? Take it out on your breasts!  The chicken kind, not your own!  Jeez peeps, we do TRY to keep this blog family friendly ;) . Anyway back to the chicken, you want it about 1/2 inch thick. Cut into 2 - 3 pieces of about equal size. Repeat for the second and set aside.


2. For the breading you'll need three separate bowls.  In the first, add just the flour.  In the second, beat both eggs well with about 1/4 cup of water.  In the third, add your bread crumbs, Italian seasoning, parsley, salt and pepper, mix well.


3. Grab your first piece of chicken and dip it into the flour, then the egg mix (let the excess egg drip off for a few seconds), and lastly your bread crumbs. Making sure both sides are well covered at each station. Continue with the rest of the pieces. Set the chicken aside and discard any left over breading mixes (bread, eggs, and flour).


4. In a large frying pan add about 1/4 inch of vegetable oil and heat until you see small bubbles starting to form on the bottom of the pan. Add 2 - 4 pieces of chicken depending on the size of your pan. Remember to slowly roll them in and away from your body; you don't want to be splattered in hot grease. Fry for about 2 - 3 minutes on each side or until the breading browns to a deep golden colour. Remove from the oil and place on plate with a paper towel on it to absorb the extra grease for a few minutes.  Then transfer to a wire rack or the one side will become soggy. Continue until all pieces are done.


5. Put a large pot of salted water on boil for your spaghetti. As always, cook per package instructions.

6.  Preheat your boiler to 500*F and place all the chicken pieces into a large baking pan and top with the mozzarella & Parmesan, dividing it as equally as you can between each piece.  Broil for about 5 - 7 minutes.  You want the cheese to be nicely melted and bubbly.


7. When your pasta is done, strain and add to a serving dish.  Mix in all but about 1/2 cup of your pasta sauce.  At this point you can serve two ways; first is to dish out the pasta into individual bowls and add the chicken to the top of each or secondly, serve family style and put all the chicken on top of the noodles and dish at the table.

8. Microwave the remaining sauce for 30 seconds so you can add it to the top of your chicken once served.  Garnish with some extra parsley.


You can, absolutely, start this dish ahead of time if you're in a time crunch.  Just stop after you've fried & drained all the chicken. I'd let it completely cool on the rack and then place in a storage container and refrigerate until you're ready to use. Then continue on with adding the cheeses and broiling and preparing the pasta.  

Stay Sweet!
Tammy


Friday, May 1, 2015

Back to Basics Egg Salad

Sometimes you just have to get back to the basics.  It seems everyone is trying to frou-frou up the classics, and there's nothing wrong with that. As a food blogger I, myself, am always trying to do something a little different.  But really, the classics never die and if you're just new to cooking world I think it's always best to start with the small & simple, tried & true recipes.  It gives a good base to build upon as you gain experience. There is absolutely nothing fancy with the ingredients here - standard pantry stuff.

Back to Basics Egg Salad


Ingredients:

2 large Eggs
1 tbsp Relish
2-3 tbsp Mayonnaise
1 tsp Onion, finely chopped (or a small pinch of onion powder)
Pinch of Paprika, Salt, and freshly cracked Black Pepper

Directions:

1. Hard boil the eggs for a good 10 - 13 minutes.  The time limit to hard boiling eggs is finicky because there's a lot of variables; freshness, pan size, and even altitude.  Something I learned in my home economics class is that you can test for done by lifting an egg out of the water with a spoon and if the water on the shell evapourates almost instantly, it's done. Just remember this only works for well done.  If you're looking to have just a soft boiled, it's a hit or miss game.

2. Drain the hot water and fill the pot with cold and allow to sit for a few minutes for the eggs to cool enough to handle.  Peel the shell and dice with an egg slicer.  Don't have an egg slicer? Cut the egg in half and pop the yolk out into a small mixing bowl, then dice the whites - this saves a lot of mess and frustration because eventually the yolk will pop out on it's own when you're try to cut it.

3. In the mixing bowl combine the rest of the ingredients to the eggs. Feel free to adjust the mayo & relish amounts to your own personal preferences.  Not a relish fan at all? Omit it completely. I love the little tang it gives to the salad.

4. Pile the mixture on to your favourite bun with a little iceberg lettuce and you have the perfect simple lunch. This recipe is enough for 2 sandwiches if you're not like me. Because to me, it's not a proper sandwich if the egg isn't dripping out of the back when you take a bite. Just saying!


Now, let's talk to those who don't have an egg slicer...Why not?  They come in handy (nicely slice eggs-no duh, mushrooms, even cheese), are readily available at your local dollar store (so obviously, not that much of a financial commitment) and hardly take up any room at all. Now, go get one! ;)


Stay Sweet!
Tammy